


Last Updated By: Kyle Carbonneau, June 2018
Purpose: How to set up a printer or copier on a TMU-issued Windows Device.
Process:
Employees cannot print from their personal devices. If an employee needs to print but does not have a TMU-issued device or is unable to print from their TMU-issued device, they can contact the IT Service Desk at servicedesk@masters.edu. IT can provide you with a TMU-issued device or troubleshoot any printer issues.
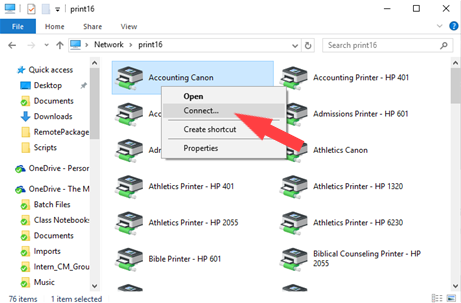
1. Open File Explorer and type \\print16 and press Enter.

2. Search for the printer(s) you want to add.
3. Double click on the printer(s) you want to add
4. Search for Settings from the Start Menu and select the top option.

5.Click Bluetooth & Devices.

6.Click Printers & Scanners.

7. Click on the printer(s) you added.
8. Click Printer Properties.
9. Click Device Settings.

10. Click Settings.

11. If you would like to not be prompted for your department code each time you print to the copier, uncheck the Confirm Department ID/PIN When Printing checkbox.
12. Input your Department ID.
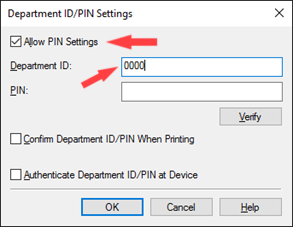
11. Press OK on the Department ID/PIN Settings window.
12. Press OK on the Copier Properties window.
13. Repeat steps 7-12 for each added printer

