



A quick-start guide for new faculty at The Master’s University.
Use Canvas to share course materials, communicate with students, collect assignments, and maintain grades. Start with the essentials below, and follow the linked help docs for detailed instructions.
In This Guide
- Sign in and find your course
- Learn your way around
- Start with the right content
- Update your syllabus
- Review assignments and grading
- Check dates carefully
- Organize materials with Modules
- Prepare quizzes
- Communicate with Announcements
- Check the student experience
1 · Sign in and find your course
Go to masters.instructure.com and sign in with your TMU email address and password. Bookmark this page for easy access.
Your Dashboard displays your course cards. Select a card to open a course. If a course is missing, check Courses → All Courses before contacting LMS Support.
Before editing: Confirm the course, section, and semester. If you have not received your account credentials, contact your supervisor.
Help doc: Quick Start Guide for New and Returning Adjunct Professors
2 · Learn your way around
Canvas has two navigation menus:
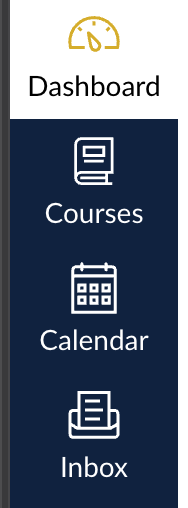
Global navigation takes you between courses and account-wide tools, including Dashboard, Courses, Calendar, and Inbox.
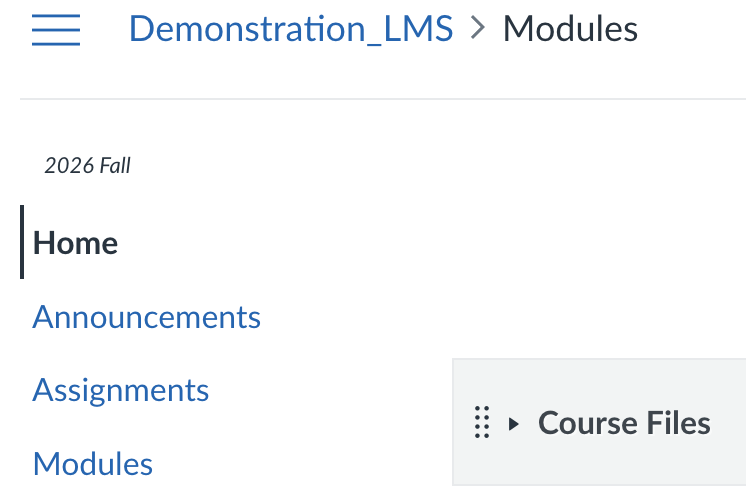
Course navigation takes you to tools within the course you have open, such as Announcements, Assignments, and Modules.
Review Account → Notifications to choose how you receive updates about Canvas activity.
Full instructions: Manage your Canvas notification settings
3 · Start with the right content
Before building from scratch, determine whether you should copy a previous course or use your department’s template. Contact LMS Support if you need the Default Department Template or are unsure where to begin.
When importing content, start in the destination course, the course you are preparing. Review copied materials for old dates, outdated information, and items you no longer need.

Choose Copy a Canvas Course to reuse materials from an existing course.
Full instructions: Import content from another course
4 · Update your syllabus
Open Syllabus → Edit and review:
- Contact information, course description, and learning outcomes.
- Textbooks, assignments, grading information, and schedule.
- Template instructions and placeholders that need replacing.
- Linked policy pages, which must be edited separately.
Include course credit-hour calculations, and make sure the written grading information matches your Canvas setup.
Remember: Editing a grade chart in the syllabus does not change how Canvas calculates grades.
Help docs: Calculate course credit hours · Canvas Gradebook FAQ
5 · Review assignments and grading
Use Assignments to create graded work and organize assignment groups. Confirm that points, categories, and any category weights match your syllabus.
Check each assignment’s instructions, submission type, points, and dates.
| Submission type | When to use it |
|---|---|
| Online → File Uploads | Students upload their work through Canvas. |
| On Paper | Students submit physical work. |
| No Submission | You record a grade without collecting work through Canvas. |
Help doc: Canvas Gradebook FAQ
6 · Check dates carefully
Dates control when students see your work, when it is due, and when they can no longer submit. If you copied a course from a previous semester, the old dates come along with it, so review them before students begin.
| Setting | Purpose |
|---|---|
| Due | When work is expected |
| Available from | When students can begin accessing the assignment |
| Until | When submissions close |
Review all your dates at once
- Open your course and select Assignments in the course navigation.
- Select Edit Assignment Dates.
- For each assignment, set or adjust the Due, Available from, and Until dates, including the times.
- Save your changes, then spot-check a few assignments to confirm the dates saved.

Review due dates and availability windows together. A due date does not automatically close submissions.
Keep in mind
- You cannot set a due date that falls after the end of the term.
- Check that the Available from date is on or before the Due date, so students can open the work before it is due.
- Quizzes can have their own dates. Review them in the quiz settings too.
- Compare your Canvas dates with the schedule in your syllabus.
Full instructions: Edit assignment dates
7 · Organize materials with Modules
Use Modules to give students a clear path through the course. Organize consistently by week, unit, or topic, and keep general resources near the top.
Create a module
- Open Modules in your course.
- Select + Module, enter a descriptive name, and select Add Module.

Select + Module to create a section for your course materials.
Add materials
- Select the + beside the module.
- Choose an item type, such as an assignment, page, file, or quiz.
- Select the item, then select Add Item.
Arrange materials in the order students should use them, for example overview → readings → activities → assignments.
Publish your module
Open the dropdown beside the module’s publish indicator. Choose Publish module and all items when everything in that module is ready for students.
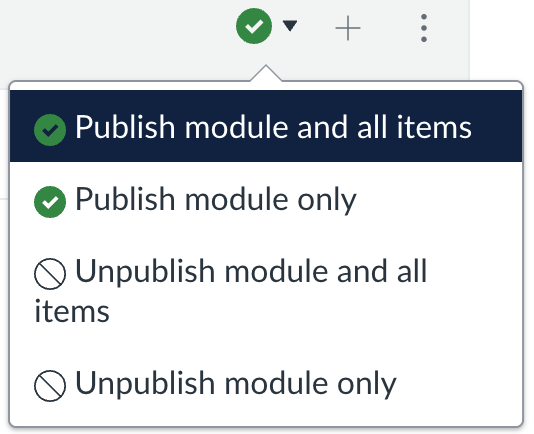
Choose Publish module and all items to publish both levels. Publish module only leaves individual items’ publication status unchanged.
Check availability dates and confirm access in Student View.
Remember: Creating an assignment does not automatically add it to a module.
8 · Prepare quizzes
Canvas has Classic Quizzes and New Quizzes. Their tools and settings differ, so follow the instructions for the version you are using.
Open Quizzes and select + Quiz/Survey to begin. If prompted, select your quiz engine.

Select + Quiz/Survey to begin creating a quiz.
Before publishing, review questions, points, time limits, attempts, dates, and feedback settings.
Help docs:
9 · Communicate with Announcements
Use Announcements for welcome messages, weekly directions, reminders, and schedule changes.
Publish the course before relying on announcement notifications. Students do not receive announcement notifications while the course is unpublished.
Full instructions: Post an announcement in a course
10 · Check the student experience
Saved does not mean published. Check the course, modules, and individual items. Availability dates can still restrict access to published materials.
Use Student View to confirm that students can find the syllabus, follow your modules, and open required materials.
Before students begin
- [ ] Syllabus and linked policy pages are current.
- [ ] Assignments, grading settings, and dates match the syllabus.
- [ ] Modules are organized and required materials are published.
- [ ] Quizzes have been reviewed.
- [ ] Links and materials have been checked in Student View.
Get help
Browse the TMU Canvas Help Docs for detailed instructions.
| Need help with… | Contact |
|---|---|
| Canvas, course setup, or grading tools | LMS Support · lmssupport@masters.edu · 661-362-2341 |
| Your account, password, or signing in | IT Service Desk · servicedesk@masters.edu · 661-362-2876 |
Include your course name, section, semester, and a brief description of the issue when requesting course assistance.


